25 November 2015

flaky spicy pumpkin pie

Even after moving away from USA, we still feel compelled to at least bake a pumpkin pie for Thanksgiving. Outside of North America, there really isn't a market for canned pumpkins. So, in the past few years, we've mail ordered pumpkin puree from the US of A about a month in advance of Thanksgiving. To save on shipping weigh, we switched to cartoned (tetrapak) pumpkin puree from Farmer's Market a year ago. We can vouch that there is little difference in quality. What's more, it's organic & the packaging is BPA-free :) 

As in years past, I turned to the recipe on the canned/cartoned pumpkin, in addition to consulting the internet for dairy-free substitutes. To be absolutely honest, I didn't like pumpkin pie: I generally don't mind consuming a piece once every season but I would never volunteer for second helpings.  But this year, for the first time, I could actually say I like it! And we (including myself) have been gradually chipping away at the pie, dreading the moment when it completely disappears. The difference, as far as I can pinpoint boils down to (1) the flaky crust which I made with my almost-5 y.o. son and (2) the extra gingery filling... 

There was one other difference, which may or may not have contributed to the flavour, but is definitely a faux pas in baking... In my inattentive haste to substitute condensed  milk with rice milk, I had forgotten to add any sugar to the pie filling until ~15 mins into the baking o_0  As we had ordered only one carton of pumpkin puree and not wanting to spoil my (American) hubby's Thanksgiving, I took the pie out of the oven (which was luckily still wobbly/runny) and very carefully stirred in ~1/3c of sugar, then chucked it back into the oven.  To my surprise, it worked!! Although the middle of the pie was notably sweeter than the filling closer to the crust (because the edge had already partially set when I pulled it out to add the sugar), it was not awkwardly so.  Oh, how I love baking adventures :) 

So, here is the recipe I used: 

For the pie crust, I used the recipe from my trusty baking book: the 2000 edition of "The Essential Baking Cookbook" published by Murdoch Books. I will not duplicate the recipe here, only to say that we were very careful to use cold butter and to rub the butter into the flour with our little hands and fingertips. It was hard work, but I think it made a difference. I do point out here that we use Lurpak unsalted block butter, which could very well have made a difference too... 

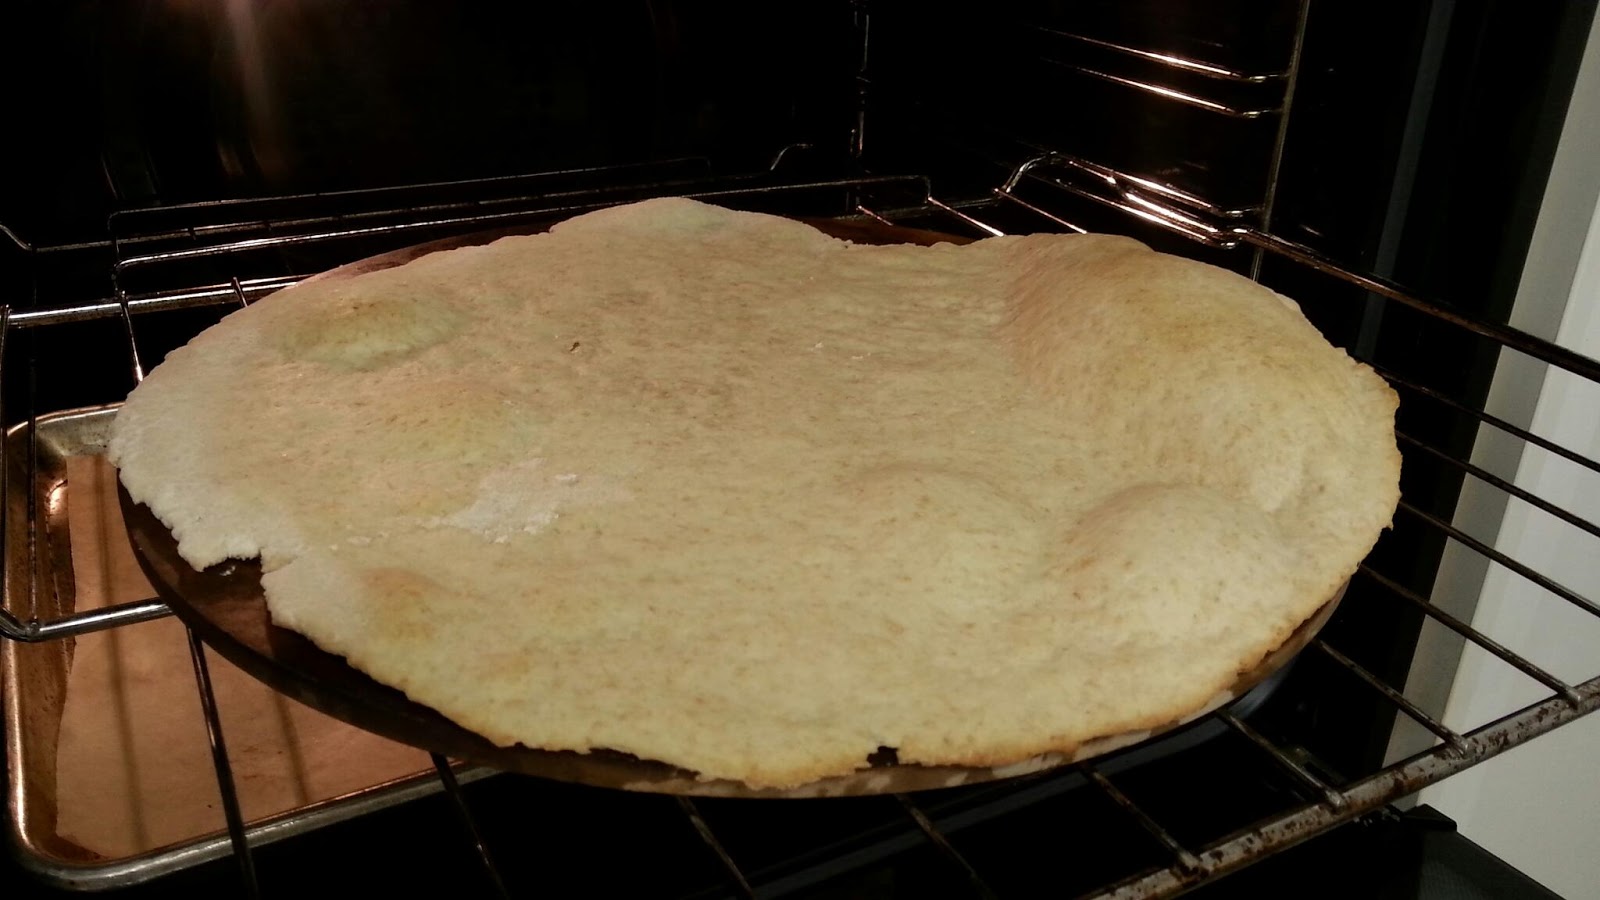
Because it was to be used for a moist pie, we blind baked the pie crust, without any baking beads, for ~20mins.  The pie did raise a bit. I pierced the air bubble immediately after removal from the oven to let the steam out; this allow pie filling to flow under the bubble. 

For the filling, I mostly followed the recipe on the pumpkin carton, but made modifications.  
Ingredients
1 (16oz) carton Farmer’s Market organic pumpkin
1.5 tsp ground ginger
3/4 tsp ground cinnamon
1/4 tsp ground nutmeg
1/4 tsp ground cloves
1/4 tsp salt
1 cup rice milk 
2 tsp corn flour
2 eggs, well beaten
1/3 cup refined sugar*
1 9” blind baked pie crust

* Yes, this was the sugar that I added a quarter of an hour into baking.  It was also suggested to me that I could have tried molasses rather than refined sugar because "that's how my grandma had always used". 

Direction
Mix all ingredients (except the sugar) together. Pour into previously blind baked pie shell. Bake at 220ºC (425ºF) for 15 minutes. Pull out of the oven to add sugar, then reduce temperature to 180ºC (350ºF) for an additional 50-60 minutes. Don't worry if it is not completely set as it will set more as it cools (wisdom from a Yank). 

17 September 2015

corn tortillas

Some months ago, we obtained a large bag of masa to make tamales (a successful cooking adventure that, sadly, didn't make it to the blog). Though many tamales were made, we barely used half of the 2 kg bag.  Here and there I would make cornbread, but I was looking for a new adventure.  Serendipitously, I'd recently bought some jalapeños from the shops (on impulse) to make tacos, but had forgotten to pick up tortillas. As I fret over when I can make another trip to the shops, I thought it may be easier to make the tortillas ... using the masa! Yes, the excuse of it being easier is really just an excuse for another cooking adventure :) 

The Kitchn has a fantastic piece on making corn tortillas using masa harina and it was the recipe I followed.  Unconventionally, for me, I followed the recipe exactly this time. The recipe was delightfully simple.  The challenge for me was the lack of a tortilla press, which I made do with a sandwich press!  I did have to further flatten the dough with a rolling pin, but it was relatively easy. I do love the smell of masa... 

It turned out great! The first tortilla was noticeably too thick, hence the rolling pin. Overall, the tortillas were slightly drier than the ones from the shops... but those are generally not 100% corn (usually mixture of corn and wheat flour).  With the compliment "these are the best tortillas I've had since leaving America", I would say it's definitely worth making again :) 

ball of masa between ziplock plastic, ready to be flattened

flattened masa


rolling pin action was required to further flatten dough

homemade corn tortillas


14 September 2015

Silverbeet & Bacon Tart

Kale is the family favourite. So when it dawned on us that kale's positioning on the Brassica branch may be the cause of our little one's GI issues, I was at a lost. What other green vegetables are there?  More specifically, what green vegetables not of the Brassica family and are cookable (because raw greens are "yucky") are there?  Sadly, after scouting several Sydney grocery stores for several weeks, only two readily available non-Brassica vegetables were identified: silverbeet (also known as chard) and spinach. I personally love spinach, but it does occasionally cause "spinach tongue", which I'm pretty sure is why "spinach is yucky" as well.  

Left with silverbeets, I endeavoured on another attempt to change the family's opinion of this vegetable. Scouting of recipes gave me two ideas: (1) Silverbeet and feta gozleme and (2) silverbeet and bacon pie.  Bacon makes everything better :)  
For the crust, I consulted out my trusty baking book:  "The Essential Baking Cookbook" published by Murdoch Books. The only substitution was the replacement of 3/4 of the 1.25 cup plain four with wholemeal flour.

The filling was based on a much slimmed down ingredient list from Kidspot:
- 1 bunch silverbeet
- 1 packet middle bacon, rind removed
- 1/2 block Liddell lactose free cheese
- 1/4 cup grated parmesan cheese
- 4 eggs
- 3/4 cup soy milk

I was pleasantly surprised by the result: that the little one actually liked it!  The points that won the family over were:
*  That it wasn't "eggy" (the use of 4 instead of 5 eggs likely helped)
*  The homemade buttery crust (from my experience, it's always much miles better than store-bought frozen ones)
*  And, of course, the bacon!

Silverbeet and Bacon Tart

26 August 2015

sourdough bread

While there's definitely room for improvement, I was delighted by how my second attempt at homemade sourdough bread turned out. 

The little monster (my sourdough starter) has gotten a lot more sour, likely owing to a healthy culture of lactic acid bacteria.  In fact, my last 2-3 pizza attempts lacked the rise of my initial success, possibly suggesting an imbalance between LAB and yeast...? [To be investigated! ... by somehow creating a more aerobic environment...?] 

I took the advice of using a regular (but good!) bread recipe and adjusting for the amount of sourdough starter added.  Thus, following ForTheFeast's recipe for A Simple Italian Bread, I baked my second sourdough loaf as follows:

I mixed (or quasi-kneaded), in a large bowl, 1.5 cups of starter (which had been maintained with plain flour), 1.5 cups of wholewheat flour, 1/2 cup water, and a sprinkle of salt. The dough was patted into a ball and coated generously with olive oil. It was allowed to rest for 45-60mins and baked at 190C as is (in the ball shape), following a cross scoring at the top.  It was baked for ~50mins. 


Result: 
Texture:  It was about half as dense as the first attempt, though (according to my family's taste), it still needs to be fluffier and chewier. 
Taste:  The sourness was very distinctive. Excellent with (genuine) butter and Australian leatherwood honey. 


30 July 2015

sourdough pizza

I finally understood what a mature sourdough starter is. When I checked on my starter this morning, approximately 24hrs since its last feeding,  it clearly increased in volume! It looked as if it was beginning to bubble itself out of its home (a 2 cup Pyrex container).
It was screaming "pizza night"!  
I didn't have enough time to mix the dough in themorning and let it rest for hours. Nor did I have any bread flour on hand.  A 5 min Google search brought me this recipe.  Unsurprisingly,  I altered it:
- Only one cup of the starter was used instead of 1.5c (mostly because I didn't have enough and wanted to leave sufficient to continue the starter)
- An extra cup of wholemeal flour (total of ~2.5c) was added, partly to compensate for using less starter and also because I wanted to make two pizzas
-  The total amount of oil used was 1/2c (it called for 8 tbps)
-  1/3 - 1/4 cup of water was also added to reach the desired consistency (enough to form dough into a ball but not damp or crumbly)
-  Aftet ~5-10 mins of kneading, the dough was allowed to rest while pizza toppings were prepared
-  2 large thin pizza bases were rolled out of it

To my delight,  the pizza rose on the pre-bake! Oh, glorious bubbles!!

The rest was easy :)  The usual favourites were added, including plain tomato paste, artichoke,  pepperoni,  and lactose-free cheese. 

The final result was definitely well received :-)  The base was flaky!  The added oil (canola) was suggested as a contributing factor to the flakiness. I think I agree. Most importantly,  the general consensus was it's not too flaky;  it was delicious

25 July 2015

Sourdough Bread

Average kitchen ambient temperature: 8-16C.
It was certainly a risk to attempt culturing my own sourdough.  But it worked!  Though more work needed to perfect the bread.

The original recipe for the starter was from Nourish Kitchen but many _ad hoc_ modifications were made:
- Feeding was dropped to once a day to twice every three days to adjust for the slower growth in the dead of winter.
- Feeding amount was also reduced to 1/4-1/3 cup of flour.
- Instead of throwing excess growth away, I split the starter. This was mostly so I have a parallel experiment. 

The starter's about 12 daya old now.  Growing slow,  but growing. Nice sour aroma. Looked a bit dry this morning,  so may start feeding more often.

25 September 2014

salmon with silverbeet coconut rice


Salmon is a favourite in our household, particularly Atlantic Salmon, which seems to be available all year round in Sydney (as are Ocean Trouts).  Oozing with omega-3 and vitamin D, and so easy to make.  A bit of salt and pepper, a few minutes each side on the pan, and done!  

The challenge is finding a side to accompany complement it and round out the food pyramid; i.e. some veg and starch.  Rice and some kind of soft, wilt-able greens came to mind. While plain rice and fresh salad would have worked find, I wanted something different. And I wanted to integrate (sneak in) the greens with the rice for two preschoolers who will be at dinner.  Coconut-flavoured rice also came prominently to mind, thus, 'tis was how this rice dish was born. 

Silverbeet (Swiss Chard, Spinach) Coconut Rice
Ingredients
- 1 can of coconut milk (size would depend on desired fragrancy; I used a full 400ml can)
- 1 cup of rice
- 3-4 (packed) cups of freshly chopped chard (any soft greens should work)
- pinch of salt

Direction
1)  Add coconut milk and water to pan, to a total volume of ~700ml.  Add a pinch of salt. Bring to boil. 
2)  Add rice, stirring until boiling point is reached again (this prevents the rice from sticking to the bottom of the pot).  Reduce heat to low and simmer, covering, for 15 mins. 
3)  Increase to medium heat.  Stir in greens, one cup at a time. Keep stirring untill all greens are incorporated.  Turn off heat and replace lid.  Let stand for at least 5 mins.